네트워크 부팅 (PXE)이란 무엇이며 어떻게 사용할 수 있습니까?

문제가있는 컴퓨터의 문제를 해결하거나 진단해야하는데 유틸리티 CD가 어디에 있는지 잊어 버린 적이 있습니까? FOG와 함께 네트워크 부팅 (PXE)을 활용하여이 문제를 과거의 일로 만드는 방법을 보여 드리겠습니다.
이미지 h.koppdelaney
PXE 개요
PXE (Pre eXecution Environment)는 다정하게 발음되는 Pixie (예 : 요정 먼지)로 네트워크 카드 만 사용하여 최종 컴퓨터 (클라이언트)를 부팅하는 방법입니다. 이 부팅 방법은 1999 년에 만들어졌으며 문제의 컴퓨터가 네트워크에 연결되어 있고이 표준을 지원하는 한 일반적인 부팅 절차 (IE 전원 켜기 –> BIOS –> HD / CD)를 사용하고 문제 해결부터 liveOS를 사용하고 컴퓨터를 재 이미징하기까지 몇 가지 멋진 작업을 수행합니다. 그러나 우리는 우리 자신보다 앞서 나가고 있습니다. 처음으로 돌아 갑시다.
PXE를 사용할 때 부팅 프로세스는 일반 순서에서 다음과 같이 변경됩니다.
전원 켜기 –> BIOS –> 네트워크 카드의 PXE 스택 –> TFTP를 사용하여 서버에서 클라이언트의 RAM으로 다운로드 한 NBP (네트워크 부팅 프로그램) –> 다음 단계를 수행하는 NBP의 책임 (일명 2 단계 부팅).
"PXElinux"NBP를 사용하면 클라이언트에 대해 하나 이상의 PXE 부팅 프로그램에 대해 서버를 설정할 수 있습니다. 어떤 의미에서 우리가 위의 모든 것을 수행하고 일부를 수행 할 수있게하는 것은 비밀 성분입니다. 전체 프로세스, 그 역사 및이 프로세스와 gPXE (보다 진화 된 사촌)가 지원하는 일부 인프라 옵션에 대한 자세한 설명은 개발자가 제공하는 YouTube 강의를 참조하세요. 또한 아래는 부팅 가능성을 빠르게 살펴 보는 2008 년 설정 비디오입니다.
골
이 가이드는 PXEing에 대한 일련의 가이드 중 첫 번째가 될 것입니다. 이 가이드에서는 향후 기사에서 구축 할 토대를 마련 할 것입니다.
권장 사항, 가정 및 전제 조건
- 테스트중인 클라이언트 시스템은 PXE 부팅을 지원하며이를 활성화하는 방법을 알고 있습니다.
- 이 가이드는 Debian Squeeze, Ubuntu 서버 9.10 및 Linux Mint10을 사용하여 작성 및 테스트되었습니다. 따라서 작업 할 데비안 기반 시스템이 있다고 가정합니다.
- 이러한 종류의 서버에 대한 디스크 및 네트워크 대역폭 요구 사항이 정말 빠르게 증가 할 수 있기 때문에 단순 파일 서버용 소프트웨어 RAID 설정 방법 및 네트워크 링크 집계 설정 방법 (802.3ad)을 살펴볼 수 있습니다. 네트워크 및 디스크 하위 시스템에 대한 복원력이 높은 서버를 기반으로 구축하는 것이 좋습니다.
- 내가 VIM을 편집기 프로그램으로 사용하는 것을 보게 될 것입니다. 이것은 제가 익숙했기 때문입니다. 원하는 다른 편집기를 사용해도됩니다.
설치 – FOG를 활용하여 무거운 작업
FOG는 * Chuck Syperski와 Jian Zhang이 만든 무료 오픈 소스 컴퓨터 복제 솔루션입니다. FOG는 정기적으로 사용 가능한 소프트웨어 (예 : Apache, MySQL 및 tftpd-hpa)를 가져 와서 무료로 생산 된 PCLM (PC Lifecycle Management) 솔루션으로 패키징합니다. 이 무료 PCLM을 사용하면 이미징을 통해 컴퓨터 상태를 백업하고 프로그램 및 설정 (IE Firefox, Office, 프린터 등) 및 구성 정책 (IE 자동 로그 오프 및 화면 보호기 설정)을 배포 할 수 있습니다. 중앙 웹 인터페이스.
참고 : FOG에 대한 Chuck 및 Jian과의 인터뷰는 Tightwad Tech에서 제공됩니다.
FOG를 PXE 서버의 기반으로 사용하는 것은 TFTP와 같은 필요한 모든 부품과 필요한 경우 DHCP를 수동으로 설치 및 구성 할 필요없이 제자리에 배치하는 훌륭한 지름길이며 FOG의 모든 기능을 보너스로 제공 합니다.
우리의 목표는 이미 훌륭한 시스템에 기능을 추가하는 것이므로 FOG 자체를 사용하는 방법이나 설치 절차에 대해 자세히 다루지 않을 것입니다. FOG의 위키는 글과 비디오 하우투와 함께 심층 정보를 얻을 수있을만큼 충분히 강력합니다. 요약 된 단계는 다음과 같습니다.
sudo mkdir -p /opt/fog-setupDownload the latest FOG packagefrom sourceforge to the directory created in the previous step.Extract the package and start the installation.sudo tar -xvzf fog*You will be prompted several times by the installer:
3. What is the IP address to be used by this FOG Server? [server-IP-detected-on-eth0] – Enter.
10. Acknowledge and follow the on screen instructions for “MySQL“.
11. Leave the MySQL password blank for the root account.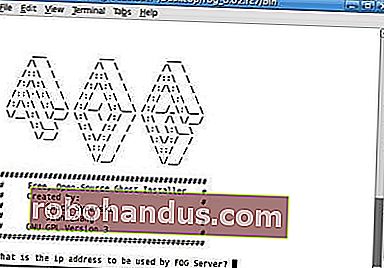
Image from the FOG wiki.Go to the Fog address with your browser and follow the on screen instructions.

*Note: Assuming you do NOT have another DHCP or that it is not setup to handle PXE. If you want to configure your existing DHCP, see Configure DHCP for PXE.
As far as installing FOG goes, that should be it. Again, while FOG is a great system, using it, is not the focus of this guide, and we encourage you to head over to it’s wiki so you can get a better grasp of FOG’s abilities and how it can help you to manage your clients lifecycle.
If all when well you should be able to PXE boot your client machine (usually F12) and get greeted by FOG’s default menu.

As a quick “taste of things to come” you may select the “Run Memtest86+” option and get greeted by the Memtest program we covered in our “Diagnose PC Hardware Problems with an Ubuntu Live CD” guide.
File and directory Structures
As stated earlier, our aim is to extend FOG’s abilities and to that end we will need to add some files and directories.
Create the subdirectory structure:
sudo mkdir -p /tftpboot/howtogeek/menus
These sub-directories will serve as templates for all the pictures, programs and configurations we will use to extend FOG.
Adjusting the “default” configuration file
We will build a new main menu, and put all of the FOG functions into their own sub-menu.
Copy the /tftpboot/pxelinux.cfg/default configuration file into howtogeek/menus/fog.cfg
sudo cp /tftpboot/pxelinux.cfg/default /tftpboot/howtogeek/menus/fog.cfg
Now edit the content of the original “default” file:
sudo vim /tftpboot/pxelinux.cfg/default
Make its content look like this:
DEFAULT vesamenu.c32
LABEL FOG
KERNEL vesamenu.c32
APPEND howtogeek/menus/fog.cfg
LABEL Utils MENU
LABEL Linux
LABEL fog.local
When we finish, this configuration will give you 3 sub-menus: “Utilities”, “Manual FOGing”, “Linux stuff”.
Create the “master” file
The master file allows us to make global changes to the look and feel of the menus without reentering them individually over and over. Things like the default background picture, border stile, position Etc’, will all be consolidated in this master.cfg file.
Create the file:
sudo vim /tftpboot/pxelinux.cfg/master.cfg
Make it’s content look like:
MENU BACKGROUND fog/genie.png
MENU MARGIN 0
The configuration above, will create the purple borders and highlighting, if you whish to have a different look and feel, simply change the values.
To set a background picture, put a picture in the “/tftproot” directory and point the “MENU BACKGROUND” to the picture’s relative path (we recommend using pictures with resolution of 640*480). For example the full path for the above configured picture would be: “/tftproot/fog/bg.png“.
Connect the FOG sub-menu to the main menu
Because we made a simple copy of the original configuration file into the menus sub-directory (keeping its color schema, timeouts and alike), if you go into this sub-menu now from the PXE booted client, it would work, but you will not be able to return to the main menu without rebooting the machine.
So edit the /tftpboot/howtogeek/menus/fog.cfg file:
sudo vim /tftpboot/howtogeek/menus/fog.cfg
Add this entry after the “menu color title” entry and before the FOG functions:
LABEL back
Create the sub menu skeletons
We have created 4 sub-menus, three of them are up to us to fill. To do so, lets create the template that we will be building on.
Create the template file:
sudo vim /tftpboot/howtogeek/menus/template.cfg
Make this its content:
MENU INCLUDE /pxelinux.cfg/master.cfg
Lets set the stage for additional sub-menus, which will be covered in future guides:
cd /tftpboot/howtogeek/menus/
That’s it, the basic layout is now ready and from now on, we only need to build upon it, which we will in future guides. Until these future guides arrive, you are encouraged to get familiar with FOG as it is an exciting ride upon it’s self.
Update: The future is here :)
How To Network Boot (PXE) The Ubuntu LiveCD
Go FOG yourself 
Original text